How to install Codex Skills with one copied instruction
The shortest path is now:
- choose a Commerce Skill and select Codex;
- copy the secure install instruction;
- paste it into Codex.
Codex downloads the short-lived package, verifies it, installs the Skill in the correct local directory, reads SKILL.md, and runs the Skill's offline environment check. Installation does not add a permanent API key or start a paid generation task.
After installation, use the separate task instruction on the Skill page for each project. You do not need to reinstall the Skill every time.
Choose a Commerce Skill or review the visual installation steps.
Before you install
Prepare:
- a working Codex environment on your computer;
- an xplaai account;
- access to the selected Skill if it requires membership.
You do not need an API key, project assets, or a generation budget to install the Skill. Prepare those only when you are ready to run the first task.
Step 1: choose the Skill and Codex
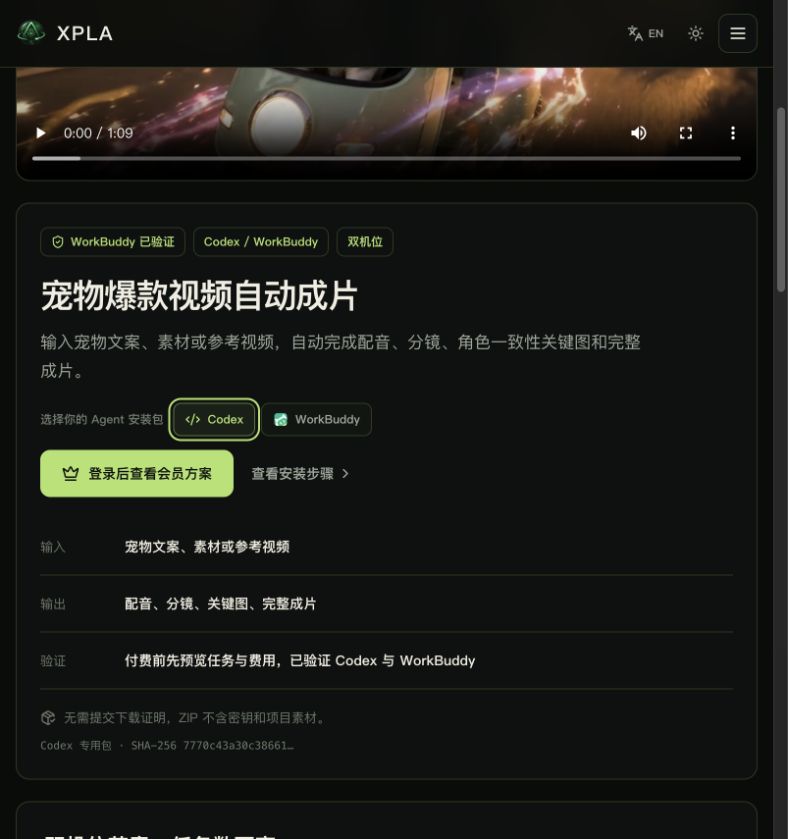
Open the selected Skill detail page, review its real case and requirements, then choose Codex in the Agent selector. Free and member Skills use the same copy-to-install experience, while access checks still follow the Skill's current plan.
The Agent choice matters. Some releases use separate Codex and WorkBuddy builds, while some use a shared build. The page selects the verified package for you, so do not rename or move package files yourself.
Step 2: copy and paste the install instruction
Click Copy Codex install instruction, then paste the complete text into Codex. The copied instruction contains:
- a short-lived download address for the selected Skill and Agent;
- the expected package name and checksum when available;
- safe extraction and update rules;
- a request to report the installed path, version, missing dependencies, and readiness.
It does not contain your permanent XPLA API key or project assets.
Install the selected XPLA Skill for Codex.
Download it to a temporary directory, verify it, and install it in
the Skills directory used by Codex. Preserve local configuration.
Then run the Skill's offline environment check and report the result.
Do not add an API key or start a paid task.
The exact copied text is generated by the live Skill page. Use that instruction instead of recreating a download URL by hand.
What the copied instruction does
The current official OpenAI documentation describes a Skill as a folder with a required SKILL.md and optional scripts/, references/ and assets/. It documents global Skills under ~/.agents/skills and repository Skills under .agents/skills.
An xplaai package can still include a verified installer for another supported Codex location. For example, the current dog-video-auto-edit installer targets:
~/.codex/skills/dog-video-auto-edit/
and runs:
python3 scripts/install_skill.py --target codex
This is why the copied instruction asks Codex to use the directory supported by the selected Skill and report the actual installed path. You do not need to guess a folder or move an archive manually.
Step 3: check the installation result
The install instruction already asks Codex to read SKILL.md and run the package-specific environment check, sometimes called a doctor check. A successful response should clearly separate:
- installed path and version;
- available tools;
- missing dependencies;
- optional tools;
- whether local configuration is ready;
- whether the Skill is ready for a task and cost preview.
If Codex does not return a clear result, use the backup check instruction on the installation page. Do not repeat the whole installation unless the original instruction expired or the Skill reports an update.
Step 4: create and configure one xplaai key only when needed
Installing a Skill and generating media are separate actions. Create a key in the xplaai token console only when you are ready to call XPLA models or data services.
Configure it using the local method described by the Skill. Do not:
- paste it into this article;
- add it to the ZIP;
- commit it to Git;
- place it in browser code;
- include it in screenshots or support messages;
- ask Codex to echo the full value back.
After configuration, ask Codex to confirm only whether the key is present—not to reveal it.
Step 5: copy the task instruction and preview cost
Return to the Skill detail page and copy its first-task instruction. Attach the required input material, then ask for a task and cost preview before paid generation:
Use the installed Skill with the source material in this project.
First show a task and cost preview. Report the planned steps, expected image,
speech, video or data task count, estimated xplaai API credit,
output paths and anything requiring approval.
Wait for my confirmation before paid API calls.
Review the plan for:
- the right source files;
- the expected number of generated assets;
- the selected models or data operations;
- editable versus final deliverables;
- output locations;
- work that can be resumed after a failure.
Approve execution explicitly only after the plan matches your intent. Future projects start here: reuse the installed Skill and send a new task instruction. Do not reinstall it for every project.
Verified example: inspect dog-video-auto-edit after installation
The pet-video Skill provides a concrete, source-backed example of the complete sequence. Its current package includes SKILL.md, installation notes and three relevant scripts:
| Purpose | Verified command | What it should do |
|---|---|---|
| Install in Codex | python3 scripts/install_skill.py --target codex |
Copy the clean Skill into the Codex user Skill directory |
| Inspect the environment | python3 scripts/doctor.py |
Report Python, FFmpeg, install paths and key presence |
| Configure the key | python3 scripts/configure_credentials.py |
Store XPLA_API_KEY through the supported local credential backend |
| Check key status | python3 scripts/configure_credentials.py --status |
Print configured or missing, never the value |
The verified minimum for this example is Python 3.9 or later. FFmpeg is needed for media inspection and final assembly. The doctor can still report dry-run readiness separately from live-generation readiness. These requirements belong to this Skill only; a research or product-video Skill may use Node.js, a different doctor command or no installer script.
The copied install instruction runs these checks automatically. If the result is incomplete, use this backup instruction:
Read the installed SKILL.md and installation notes completely.
Run only the documented doctor or offline environment check.
Report:
1. the exact installed path and Skill name;
2. required and optional dependencies;
3. whether XPLA_API_KEY is configured, without showing it;
4. the supported dry-run command;
5. every step that can call a paid API.
Do not install unrelated global software and do not run a live task.
Verify the first result
After execution, ask Codex for a completion report:
- which steps succeeded;
- which steps failed or were skipped;
- the paths to generated files;
- the public xplaai model names used;
- remaining manual review;
- whether the project can resume from the failed step.
Open the deliverables yourself. Review product claims, logos, likenesses, rights, captions and platform-specific requirements before publishing.
For workflow-specific examples, continue with the Commerce Skills tutorials. If you are building your own integration around the same services, review the xplaai API overview.
Troubleshooting
Skill not detected or the instruction expired
Return to the Skill page, select Codex, and copy a fresh install instruction. Ask Codex to report the installed path, Skill name, and package-specific environment-check result.
Invalid API key
Create a new key, remove accidental whitespace and configure it locally. Do not paste the full value into a public message.
Missing dependency
Use the doctor output to identify the exact tool. Follow the package instructions instead of installing unrelated dependencies globally.
Insufficient account capacity
Review the current account state in the xplaai console. Keep the run paused until you understand the expected task count.
Interrupted generation
Ask Codex to report completed and failed steps. Where the Skill supports resumable execution, continue only from the failed step instead of repeating successful paid work.
Skill update available
Copy a fresh Codex install instruction from the Skill detail page. Ask Codex to preserve local configuration, update the installation, and rerun the doctor check. Keep local secrets outside the package.
Frequently asked questions
Can I use the WorkBuddy package in Codex?
Choose Codex before copying the install instruction. The page selects the verified build. Do not create compatibility by renaming or moving package files.
Where does Codex install the Skill?
OpenAI's current general convention includes ~/.agents/skills for global Skills and .agents/skills for repository Skills. A verified xplaai installer may use a supported package-specific path such as ~/.codex/skills/<skill-name>. Ask Codex to report the actual path.
What doctor command should I run?
You normally do not need to choose one. The install instruction asks Codex to run the environment check documented by the selected Skill. If you need a second check, use the backup instruction on the installation page.
Where should I store the xplaai key?
Use the local configuration method in the Skill instructions. Never put the key in the ZIP, Git, browser code or public logs.
How do I avoid unexpected API usage?
Request a dry-run that reports task counts and expected API credit. Approve paid execution only after reviewing the plan.
What if the Skill is installed but the first task fails?
Ask Codex for completed and failed steps, fix the reported issue and resume only the failed portion where supported.
Is installing a Skill the same as installing a Codex plugin?
No. A Skill is a reusable workflow folder containing SKILL.md and optional resources. The copied xplaai instruction installs that workflow locally; it does not install a Codex plugin.
Does a free Skill make image or video generation free?
No. Skill access and xplaai API usage are separate. A free Skill can still call paid data, speech, image, or video services after you approve a live run.
Choose your first Codex Skill
Browse xplaai Commerce Skills, open a real case, select Codex, and copy the install instruction. After setup, return to the Skill page and copy the first-task instruction.